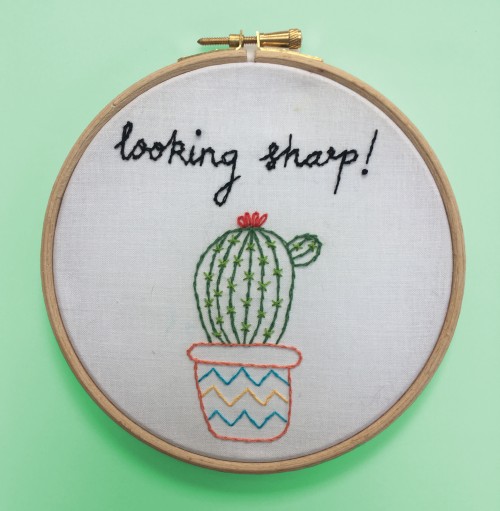
Stitch Create and Craft’s Cactus Embroidery Hoop
easy, Embroidery, Great British Sewing Bee, makes, needlework, quick makes, sewing, Sewing Bee, stitching
2017

Cacti and succulents remain popular motifs, inspiring this fun embroidery hoop hanging by Create and Craft’s sewing ambassador and The Great British Sewing Bee winner of 2016, Charlotte Newland. The following project takes one to two hours to complete and is great for beginners, using basic techniques such as split stitch for outlining and writing, plus French knots wherever the design features a dot.
Get started
Embroidery threads (206865)
Embroidery needles (375276)
Embroidery hoop, 6” (305218)
White cotton fabric
Water-erasable fine tip fabric marker (375323)
Stitch a cactus hoop
1 Download the templates here and print out. Tape the cactus design to a window and transfer it onto white quilting cotton or similar with a water-erasable pen. Loosen the screw on a 6” embroidery hoop, remove the outer ring, and place the fabric over the inner ring. Replace the outer ring and tighten the screw. The fabric must be tight in the hoop, so gently pull on the edges all the way around before the screw is fully tightened.
2 Choose whichever thread colours you like to complete your design – the writing was worked in black for this example, but you can use any shade you want. Before working any part of the motif, cut a length of your chosen thread and carefully divide it into two pieces of three strands each.
3 The outlines and writing in the cactus design are all sewn using split stitch, which makes a nice solid line and is easy to work. First, sew a single stitch (top left). Bring the needle up through that stitch, about 1mm from the end (top right). Take the needle through the fabric to complete the stitch (bottom left). Continue to make a solid line (bottom right).

4 When you get to the end of a section or near the end of your length of thread, bring the needle to the back of the work and sew through one of the stitches (but not the fabric itself). Make a loop in your working thread and sew through that as well. Pull tight to make a knot.
5 Once the outlines have been completed, dot the ‘i’ and the exclamation mark using French knots. Bring the needle and thread through to the front of the work (top left), then wind the thread around the needle two or three times (top right). Pull on the thread so that the knot sits against the fabric and insert the needle through the fabric a couple of threads away from where you originally came up (bottom left). You should be left with a nice round knot (bottom right). French knots can be a bit tricky, so you may want to practise them on a spare piece of fabric first.

6 When you have finished stitching the whole design, remove the visible marker pen by spraying with water or dabbing with a damp sponge. Once the fabric is dry, tighten up the screw on the hoop with a screwdriver and cut away the excess fabric from the back.
You can find a wide range of sewing supplies at Create and Craft
New this week
.jpg)
Quick Quilting & Patchwork Patterns and Inspiration
9 Apr 2025
[includes sponsored content] From small pieced projects to statement throws, these patterns and products…

Easy Ways To Get Kids Sewing!
11 Mar 2025
[contains sponsored content] Share your love of sewing with a young one and give…

Creative Book Awards 2025 Shortlist Unveiled!
17 Jan 2025
Welcome to the Creative Book Awards 2025! Since launching in 2021, these awards…
